Building Apollo

Apollo behind the scenes: see what we are working on right now!

Create dependencies between tasks

Wednesday August 5, 2020

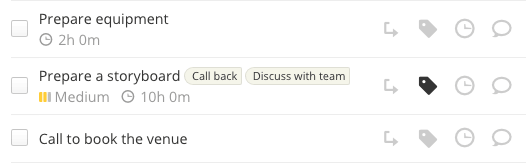
Do you remember when we introduced the ability to split tasks into subtasks? Since then, it's become the most used feature among our users. If you, too, are an avid user of subtasks, then you will also appreciate today's new feature: the ability to create dependencies between tasks.

At first sight they might look the same, but task dependencies have no parent-child relationship; this means that you can relate tasks in different task lists. Also, subtasks prevent you from marking the parent task as completed until all its subtasks have been marked as such; with task dependencies you have full control of which task should be started or completed before another task can be started or completed.

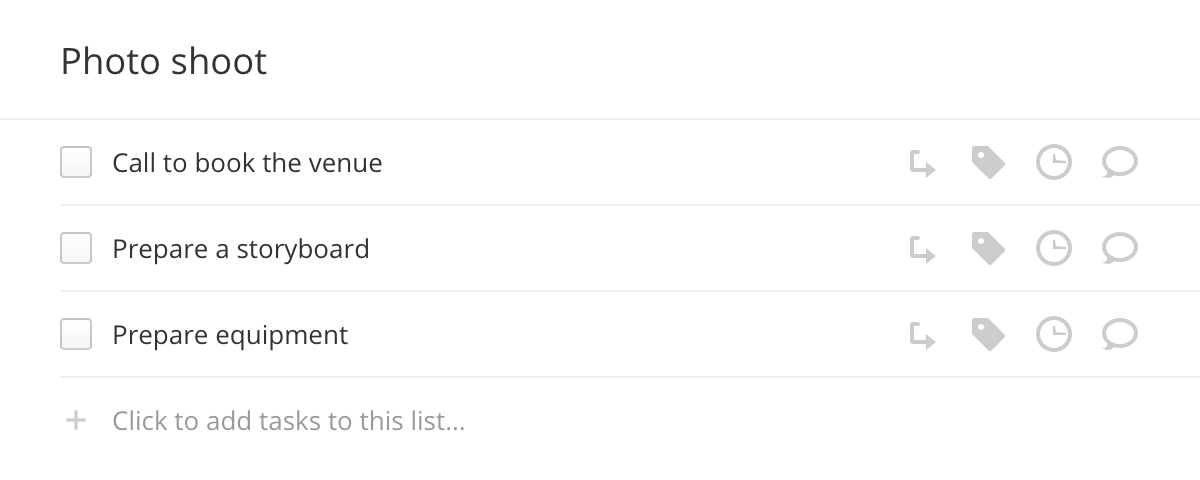
To start with task dependencies, first create the tasks that will depend from each other, like our example below. Keep in mind that they don't need to belong to the same task list.

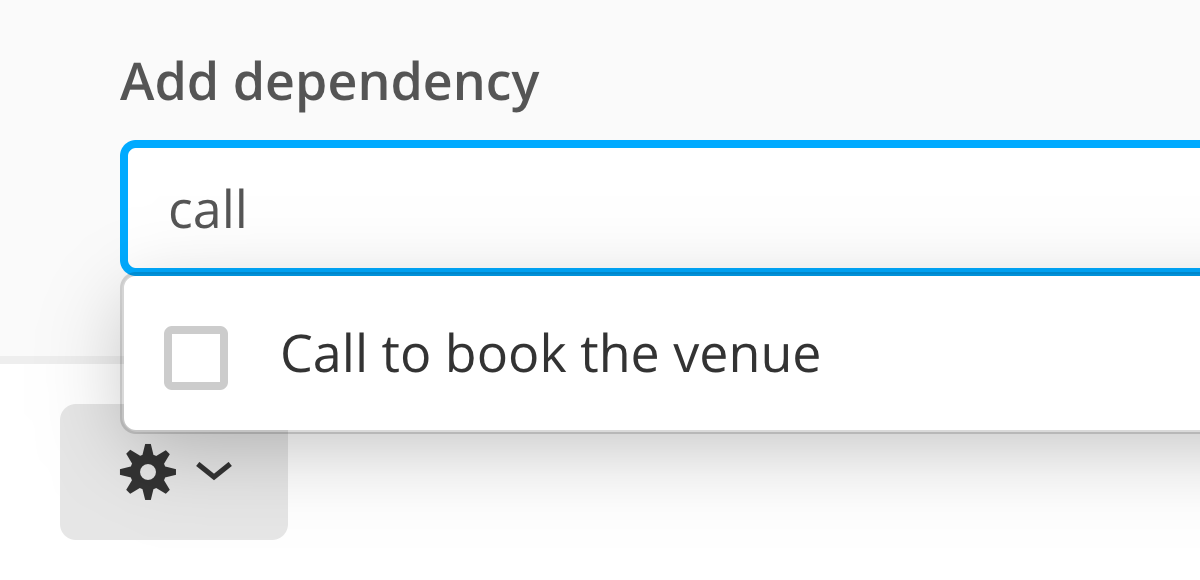
Then click the Edit button on the task that will depend from another and add the latter from the Dependencies tab. Just type a few letters to get task name autocompletion.

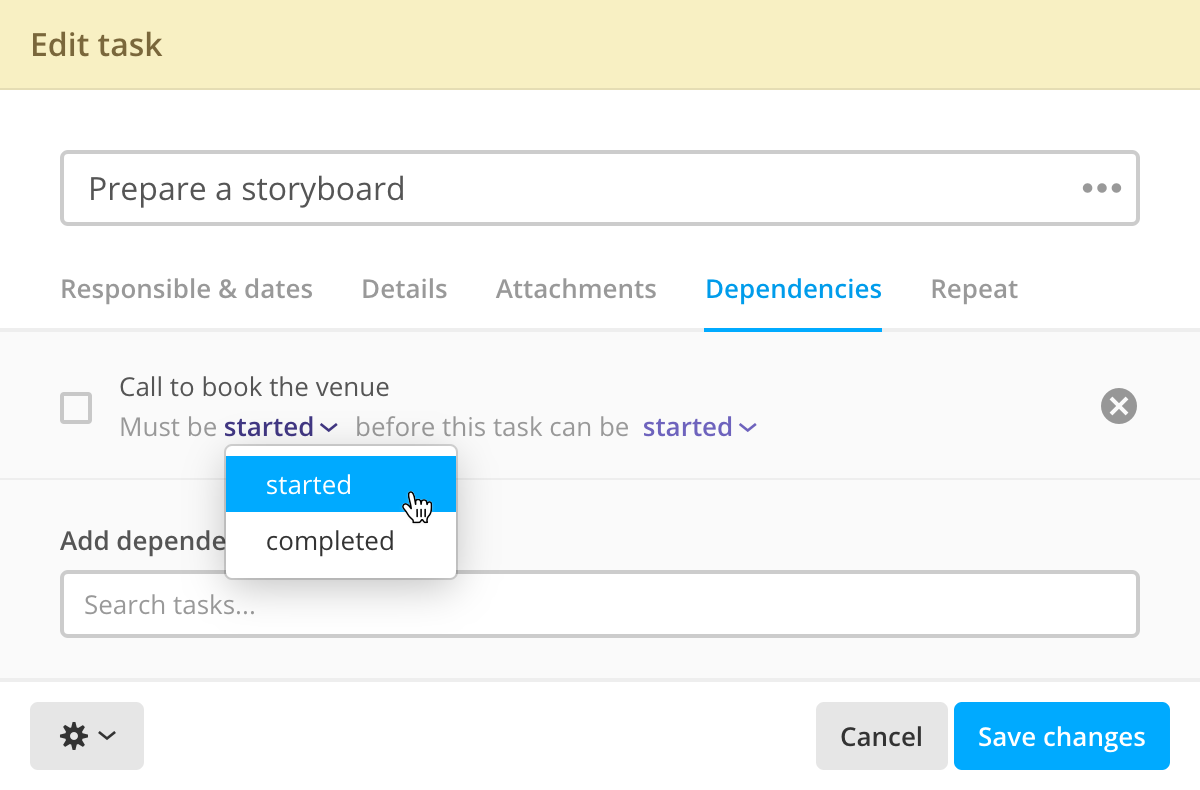
Select the task, tweak the dependency constraints, then save.

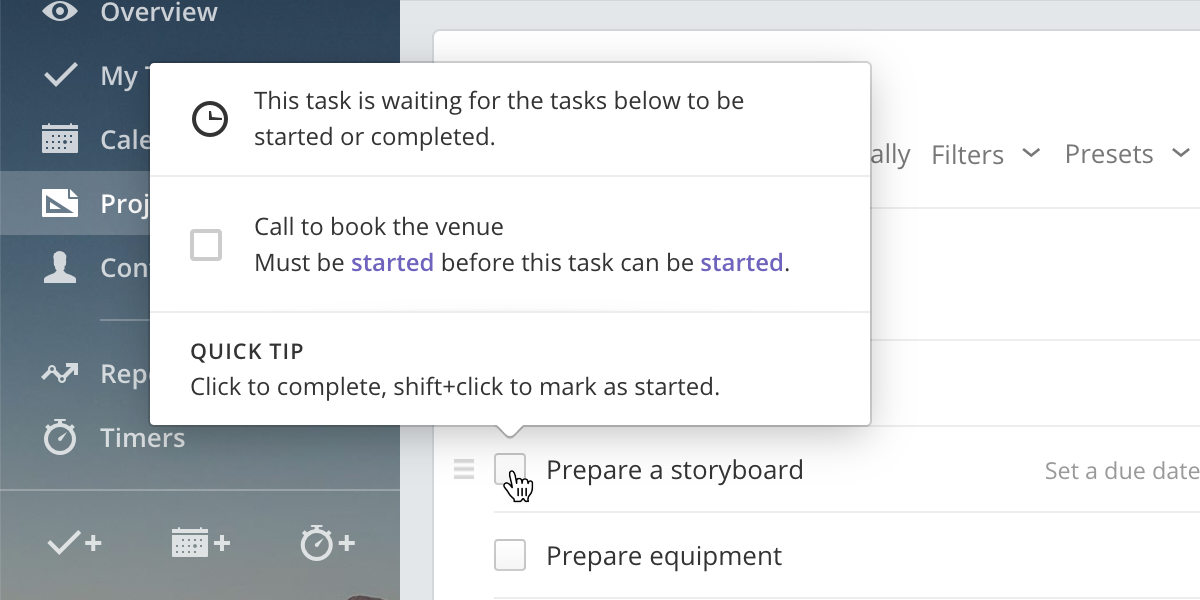
Unlike subtasks, tasks with dependencies show no visual clue of which task they depend on, but you will get a warning message while trying to change the status of a task that has unmet dependencies.

To see all dependencies (and subtasks, that ultimately are hard dependencies), just hover the task's checkbox and wait for the summary tooltip. Alternatively, you can open the task detail page and click Dependent tasks.

And if you're a regular Gantt chart user, you'll be happy to know that dependencies are also visually represented there, giving you a better overview of their relationships.

That's all for today. As always, thanks for reading!

Restore deleted items

Tuesday June 9, 2020

If you have ever deleted something accidentally, changed your mind after deleting it, or just been afraid of misclicking a button that would result in data loss, you're not alone, we've been there.

Well, you're gonna have some peace of mind starting today, since Apollo has now a trash bin, and it works exactly as the one on your computer: it allows you to recover previously deleted items.

All you have to do is click the trash link in the list page of the item you're looking for. In the example below, it's the file list:

There you'll find all deleted items, and you have a choice to restore them. If you wish, you can also delete them permanently. Keep in mind that deleted items will stay in the trash for 40 days before they get automatically deleted forever.

It's not just the file list. The trash bin is available for every item type in a project (messages, tasks, milestones, etc.), for tasks and notes on the CRM side, and for comments on any element.

Each user is able to restore any item they deleted, while users with the ability to edit other users' stuff are now also able to restore them.

This feature has been enabled (but hidden) for a few weeks to allow the Brave Collective — the group of Apollo users who get to try new features before everybody else — to test it thoroughly, so you may find something on your trash bin already. If you wanted to retrieve a deleted item, that's a good opportunity.

Thanks for reading!

Import tasks from file

Tuesday March 3, 2020

Keeping a task list organized is something to be proud of, but sometimes we cannot devote much time to it. From time to time we find ourselves jotting down a list of TODOs in a text file, only to manually move it to Apollo later, something that's tedious and/or time consuming.

Starting today, this data entry will be much faster, because now there's the ability to create tasks and task lists from a file.

Just open the Tasks section of a project, click the Add a task dropdown, and select Import from file to show the import window:

Download the sample file, open it with any spreadsheet app that can handle .xls files, and add all your tasks. Save and upload the file back in the very same dialog window, then confirm by clicking Import tasks.

The example file is self explanatory, and contains a few example tasks to introduce you to the format, but here's a little guide in case you find yourself lost:

  • Fill in the Tasklist and Description columns – leaving the Task column empty – to create a new task list.
  • Fill in the Tasklist and Task column to create a task in that task list. If you leave the Tasklist column empty, then the task will be saved in the project's inbox.
  • To assign tasks, specify the assigned user in the Assign to column. Apollo will assign the task to the first user with that name found in your workspace. For example, if one of your users is “John Smith”, then you just need to write “john”. If you have “John Smith” and “John Herrald”, you will need to specify “johnsmith” or, even shorter, “johns”. You can also assign to both users by separating the names with a semicolon, like so: “johnsmith;johnherrald” or “johns;johnh”.
  • Specify start and due dates with the YYYYMMDD format, like “20200405”.
  • Specify priority with “Low”, “Medium” or “High”.
  • Specify the estimated time either in minutes, clock or hours/minutes format. For example “25”, “1:30” or “1h 15m”.

That's it! Tens, hundreds, or even thousands of tasks in a breeze.

Thanks for reading!

Restrict time logging dates

Monday December 23, 2019

Welcome to another update regarding the time logging features in Apollo. In fact, after introducing limits on billable time, which tracked the amount, today is all about restricting the period on which time can be tracked.

After we released Strict Project features this summer (also have a look at the FAQ to check if it's useful to your team), quite a few of you sent their use cases.

Instead of letting your team log time on any date, inside Settings → Defaults you can now limit the range of selectable dates in days, weeks or months.

A few users also asked us to disable future time logging, because assigning time to something that hasn't still happened leads to errors. Since we didn't want to break existing functionality, we opted to use the same limiting ability used for past time logging.

These settings can also be overridden for each project by heading to the project settings end enabling Override default time tracking rules. For example, you might want to disable future time logging and restrict past time logging even more, as shown below:

Once set, project members will not be able to log time outside the selected range, forcing them to discuss it with the team:

That's all for today. Remember that we value all your feedback and ideas, so if you have any, drop us a line.

Thanks for reading!

Set limits on billable time

Tuesday November 19, 2019

Welcome back to Apollo updates. We have a few new features to show you in the following weeks, but we'd like to start with one that mainly concerns project managers and clients.

Starting today you can set a limit on the amount of billable time for each project.

It might seem something that could be already done using the budget tracking feature introduced in Apollo a while ago, but it's actually a softer approach for those who don't need a full fledged budget tracker – which takes a lot more variables into account – but still want to be notified once a limit is about to be reached.

To enable the billable time limit, head to the project settings, set the “Max billable time” amount, activate the “Warn the project manager” checkbox right below it, and save.

If you haven't picked a project manager yet, you can do it by selecting one from the “Project manager” selectbox in the same screen. If you don't want to pick a single person, just leave it as is and the billable time limit notification will be sent to all project members that have the “Can manage projects” permission (those who can edit the project settings and its members).

That's all for today, but you can find a couple minor changes below.

Thanks for reading!


New features

  • Project expenses can now be exported as a CSV file.

Bug fixes

  • The days/weeks/months selector in the tasklist's bulk actions popup wasn't working correctly.

Enforce strict rules in your projects

Tuesday July 30, 2019

The theme of this month has been all about collecting, organizing and implementing many slightly different requests that we received over time from you, all centered on projects control.

Of course a clear and constant communication with your team and clients, along with detailed planning will always be the bread and butter of your project management, but:

  • How many times you had to politely ask to please add start dates to tasks?
  • How many times you had to ask to add approximate start and end dates when creating new projects?
  • And what about subtasks? Isn't it funny that most of the time a subtask's due date slips well after the due date of the parent task?
  • And people adding time entries to tasks NOT assigned to them? That is, tasks that they were NOT supposed to work on? Oh well…

We've all been there; But starting today you have a new tool in your toolbox to enforce some rules and get some sanity back! 😅

It's called “Strict project”, and it's an option available both to new projects – you'll find it in the New project dialog form – and existing ones, by going to the project's settings.

Once the project turns “strict”, a set of new rules must be met when manipulating tasks, milestones or time entries, in order to alleviate the problems mentioned above.

We won't bore you with the finer details, but if you are curious you can read our dedicated FAQ about strict projects.

Thanks for reading!


New features

  • Expenses' receipts can now be uploaded as PDFs.
  • Configurable project features are now fully supported in project templates.

Enhancements

  • Added the event creation date inside the event preview popup.
  • Adding a new project from a template now uses the template category if there's no category selection.

Bug fixes

  • Sometimes expenses' receipts were not saved.
  • The time form was also showing roles and companies in the "Person" selectbox.
  • The search refinement system inside tha tasks page (My Tasks, Tasks across all projects, etc.) was not working in Safari.

Add tags to project tasks

Monday April 15, 2019

Welcome to the April update of your favourite project collaboration system!

Let's talk about busy projects, how they get overloaded with content quickly, and how sometimes the usual hierarchy that sees tasks and subtasks in task lists, and lists linked to their milestones can still be not enough.

Today we introduce the ability to tag all tasks in Apollo. You'll be able to apply one or more labels to tasks in a way that make sense to you and your teammates.

Here's what does a tagged task looks like:

Click the tag icon on a task, and you will be presented this popup:

The first section of this popup allows you to search and add tags to the task. Note that there are no restrictions on tag names:

  • You don't need to put a # in front of it (but that's totally up to you)
  • You don't need to use underscores instead of spaces
  • You can use special characters
  • You can use ✨ emojis ✨

For example, instead of "#review_before_end_of_year" you can write "Review before year's end" or "Review / 2019".

The most common scenario for tags is to add more context to a task. For example bug or call, or the name of a place if the task can only take place at a specific location. We advice you against using tags in place of other fields that are already present in Apollo, such as the Priority of the task or the assigned person. Don't be the guy that tags tasks as high priority when there's already a Priority field available!

Search and filtering

No tagging system would be useful without filtering, and Apollo has got you covered. Once you start using tags on tasks, the filtering system will show handy controls to see only tasks with the tags you specify.

Project vs Global tags

Working on a team means that different team members could think of a different tag name for the same concept. Add that for every project and you'll quickly end up with an unmanageable tag cloud, or with tags that don't make any sense in the current project.

That's why tags are siloed into each project at first – a tag added to a project task will only be available for tasks into the same project.

If you want a tag to be available globally, just make sure you have the ability to edit other user's stuff (or ask the workspace owner) then head to Settings → Tag management and click Task tags (only needed if you have ability to track contacts and leads).
Click on a tag and select Make this a global tag.

This mixed approach should bring together the best of the two worlds, giving you the freedom to create all the tag noise you need in a specific project, but also the ability to curate a clean set of global tags over time.

Thanks for reading!

Duplicate projects

Monday February 18, 2019

We're back with a new feature you asked for over and over again: the ability to make copies of your projects. 🎉

Admittedly, it doesn't look like the most exciting feature out there, but there are definitely some interesting use cases. Here are some of them:

  • Before making important structural changes to a project
    Duplicate the project, do your stuff, and if you're not happy with the result, just delete the project copy and go back to the original one.

  • As an alternative to project templates
    Not everybody likes project templates, just like not everybody likes coffee, or Nutella, or pizza. Just make a copy of a project to use it as a starting point whenever you want. And yes, actually everybody likes pizza!

  • To freeze a project to its current status
    Although Apollo offers revision history for project items, sometimes you might want to keep track of what the project was at a certain date, as a whole. By duplicating it, and removing other users from the duplicated project if necessary, you can do it!

  • To split big projects into more manageable ones
    Projects grow, scope creep is behind the corner, more people join in, things get complicated fast. Split the messy project into two more manageable ones, by duplicating it and deleting unwanted data from both. It will be easier on the mind and on the eyes.

There are a lot more use cases emerged from your feedback. They range from meh to that's legit, to why isn't the feature there already? – they all contribute to Apollo, so keep your feedback coming!

That's all for today. Thanks for reading!


Bug fixes

  • Project activity sometimes didn't load if there were items regarding project expenses.
  • Estimated time in the project overview was visible to users that weren't allowed to see it.
  • Mobile: editing a timer description wasn't saving on first try.

Set budget access level for each user

Friday December 21, 2018

We hope you're enjoying the Budget tracking feature we released last month. The response and appreciation from our users was overwhelming, and for good reason! It's a tool that you don't even need to actively use; just set it up and glance at it from time to time to make sure your budget is below the limit line – or be notified when it reaches a specific threshold.

Speaking of user response, your feedback spurred some interesting ideas, one of which is today's new feature. As mentioned in the last post, the Budget tracking section was only available to internal users with the “Can manage projects” permission, which somewhat limited its usefulness to the team.

Starting today tough, you have the ability to specify the Budget access level for each user, on a project by project basis.

To do so, click the People and Permissions menu in a project and select the access level for each user.

Access levels are simple and self explanatory: “no access” means that the user won't be able to see or access the Budget submenu at all; “can see” means that the user can access the Budget screen but cannot mess with it; the last one gives full access instead.

All users that could already access the Budget feature (because they had the “Can manage projects” permission) have already been granted the highest permission, so this additional flexibility in the permissions does not get in the way of your daily activities.

That's all for 2018. Merry Christmas and Happy New Year!


Enhancements

  • Set a more readable link color in corner notifications.

Bug fixes

  • The task form was not allowing the due time to be before than the start time, even when the due date was later than the start date (e.g.: starts today at 8pm, ends tomorrow at 6am).
  • The link for refreshing a project tab in a notification was instead showing the Overview.

Budget tracking

Tuesday November 13, 2018

In our last update, we talked about the new Expenses section, a tool for tracking expenses for a project. Keeping tabs with expenses is not the only piece of the puzzle though; to ensure your projects are profitable, you need an accurate project budget too!

Starting today, there's a new integrated tool in Apollo to help you achieve that: Budget tracking.

Now you can set the budget for a project, calculate its costs (down to the nickle) based on time and expenses, and stay updated on the remaining budget.

To start, just open a project (even an existing one), click the Budget menu, then click the Budget settings button. There you can decide how the budget should be tracked for that project. Please note: the Budget menu is available only to internal users with the "Can manage projects" permission.

We tried to cater to the most common scenarios, from the most simple where there's just a fixed total budget – either as a fixed amount of money or as fixed amount of time – to the more specific cases, where you want to specify the budget per category or per person.

Depending on what you set, you might be asked to set the hourly rate for the project, category, or user, which you can do by clicking the Hourly rate settings button.

The budget screen also shows the internal cost subtotal, which is the sum of the project expenses and the internal cost of people working on it. The hourly rate for the "Internal cost" section is a different amount that can be set from "User Cost Rates" screen inside Apollo's general settings.

Now you're set! Just keep tracking time and expenses, and glance on the chart from time to time to make sure the ship is on its right course! Or, just setup the automatic alert feature to receive a notification when the used budget reaches a specified threshold.

Thanks for reading!